Guest Blog from Maria – Poole Mumbler & Alice – Big Bang Science
The awesome Big Bang Science team have shared some simple and thrilling science experiments for children aged 3 to 11, using only a few ingredients that you might already have at home.
I first met the Big Science Team when my eldest (6) attended one of their science holiday clubs during a school break a year ago. He had never been particularly interested in science but one of his school friends was going so I signed him up too. He loved it so much, he still talks about it. The school club only lasted a few hours, but it awoke in him some deep-rooted interest in science that we didn’t know he had. And it only gets bigger as he gets older. All he wants to do now is science. In fact, he wants to be a scientist when he grows up. We can certainly do with a few of those at the moment.
I realised the Big Bang Science team really know what they are doing. They are brilliant at teaching kids how fun and fascinating science can be. I hope you find them really useful.

Hi, my name is Alice, and I am a qualified science teacher and founder of Big Bang Science. Our aim at Big Bang Science is to nurture children’s natural curiosity and inspire the next generation of budding young scientists. If you like some of these experiments why not purchase our Big Bang Science ‘Big Box of Experiments’. And look out for our monthly subscription boxes coming soon. Please like us on Facebook to keep up to date.
With 3 children myself, I know how tricky it can be keeping children busy and entertained in the right way. I have included 6 experiments that I think will keep any child happy. These tried and tested science experiments are:
The first 3 experiments include a little bit of awesome magic and also another way to create a really colourful rainbow using cool chemistry!
The last 3 experiments are based around the weather and changing weather patterns, I thought these could be fun and educational too!
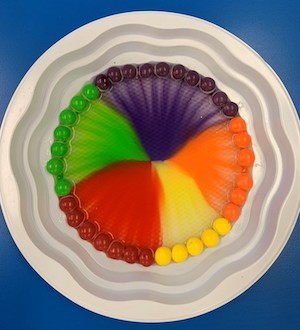
Skittle rainbows
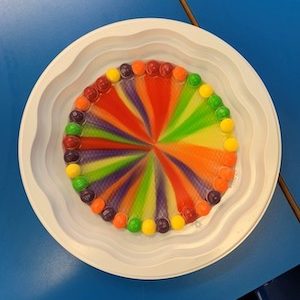
Rainbows are everywhere at the moment, as they symbolise the tremendous work and thanks we give to our fabulous NHS workers, so what better way than to open with a skittle rainbow experiment.
Place the skittles around the edge of a plate. The edge of the inner rim is best. The skittles can be arranged in any way, so this is great for the children to be creative and decide themselves. They can be arranged either in colour groups or a repeating pattern or even better… just random. The skittles should be touching for best results. Into the centre of the plate pour some water. This can be cold or slightly warm. Pour the water in gently and just enough so it reaches out and touches all the skittles at the edge of the plate. Now watch…. After a short while, you will begin to see the colours from the skittles dissolving into the water and after about 5 minutes a beautiful rainbow pattern will have been made. It’s really important not to jog the plate when this is happening as the colours can muddle up.
The Science
You may wonder why the colours don’t mix up as the rainbow forms…well here’s the science. As the water dissolves the colour and the sugar from the skittles, the sugary solution moves from a high concentration (by the skittle) to a lower concentration (towards the centre of the plate). As there are multiple bands of coloured water all doing the same thing, they don’t travel sideways but to the centre and therefore do not appear to mix. This can also be demonstrated by squirting perfume at one side of the room and counting how many seconds it takes to travel to the other side of the room (another fun thing to try).
Extensions
See if you can chat to your child about how real rainbows form. What 2 weather conditions need to be present to see one?
See if they can learn the 7 colours of the rainbow using this acronym, ‘Richard Of York Gave Battle In Vain’ (Red, Orange, Yellow, Green, Blue, Indigo, Violet)
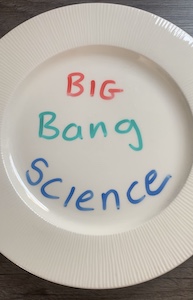
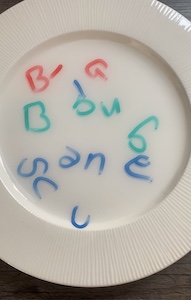
Dry-wipe wiggle
You will need:
This experiment feels a bit like magic but there is some really cool science behind it too. Maybe you could impress your family or your grandparents on a Zoom call with this experiment!
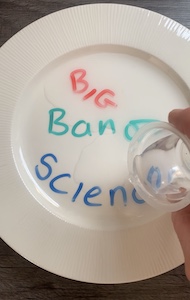
Find a shallow white dish or plate that is clean and dry. Using a dry wipe pen draw a stick man or write your name. You could fill the whole plate or draw more than one image to fill the space. Carefully and slowly pour some tap water onto the plate away from the images you have drawn and watch your plate come to life.
Can you make the images wiggle?
The science
The ink in dry wipe pens, usually used by teachers on whiteboards, is not designed to stick too strongly to anything. The ink is regularly wiped away, so it has low sticky strength. Permanent pens like sharpies, however, have very strong sticky strength so are really difficult to remove.
In this experiment the dry wipe pen attaches to the plate but not too strongly and if you pour water onto the plate it begins to lift as a whole unit. The ink in the dry wipe pen is insoluble which means it doesn’t dissolve in water and is also less dense than water so floats to the top. It gives the impression that the letters or pictures are dancing! Cool hey?!
Points to remember
Extensions
Can you create a really colourful scene or write a message to someone? Maybe you can film it as it come to life and send your message to someone as a surprise!
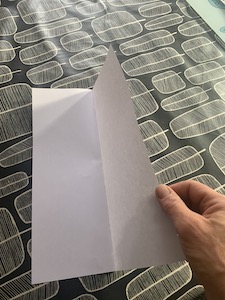
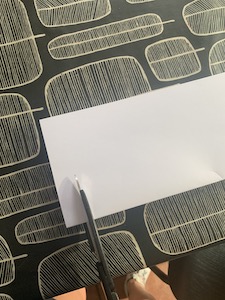
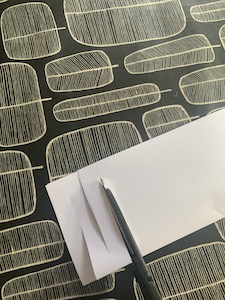
Paper loop
Can you climb through a piece of paper without tearing it?


You will need:
For this activity, you may need help from an adult.
This is really cool so I’m really excited to share this trick with you! Most people are a lot larger than a piece of A4 paper. But in this activity, you’ll be able to squeeze through a hole in a sheet of paper. You might even be able to squeeze your adult helper through too!
You will need some scissors, a sheet of A4 paper and an adult!
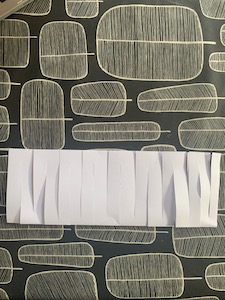
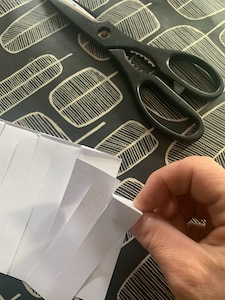
Pull the paper apart, being careful not to tear it. You should have a large loop. Now try to fit yourself through the loop!
Points to remember
The Science
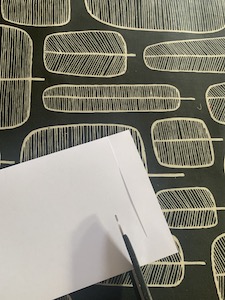
If you look at the cuts you’ve made in the paper, it looks like a maze. But you’ve actually turned the sheet of paper into a really long loop that should be long enough to go all the way around you.
The size of the sheet of paper remains the same throughout the activity. But cutting the paper made the perimeter (edge) longer. If there are enough cuts, the perimeter is large enough to go all the way around you.
Extension
If you can’t fit through the loop, try making another one with either, a larger piece of paper(A3), or putting the cuts closer together (try 5 mm apart and stopping 5 mm from each side).
Maybe you can get your whole family through in one go!
Storm in a jar
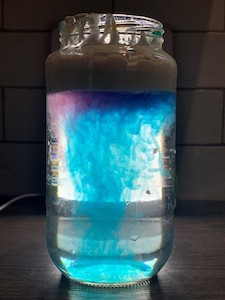

What if you could float into the sky and watch a storm happening from above the clouds? If you’ve ever travelled on an aeroplane, then you will know what it feels like to be above the cloud level, looking down. This is exactly where you are going to go in this activity…well, almost.
You will need an empty jam jar or a large glass. Fill it about three-quarters of the way with tap water. This represents the air. On top of the water, you are going to squirt some shaving foam to fill the rest of the jar. This is your big fluffy cloud. Next, either using food colouring or poster paints dissolved in a small amount of water, squeeze (using an old Calpol or Nurofen syringe) the colours into your shaving foam. After a few squirts, you will notice the shaving foam becoming full of extra liquid which will eventually burst through into the water layer below. The colours represent the rain.
You can make it authentic by just using blue colours or make a rainbow by having a selection. This quick, easy and delightfully mesmerising experiment is great for all ages!
The Science
Have you ever wondered why clouds form in the sky? Clouds form when moisture is collected in the atmosphere. When you see clouds, you are seeing water vapour that has attached to small particles of dust in the air. When the cloud eventually gets too heavy to hold any more water vapour, we say it is SATURATED. When this happens, the water vapour begins to turn back into water (CONDENSES) and rain begins to fall.
Extensions
Try the experiment again and use slightly warmer water in the jam jar. Does this make a difference to how quickly the colours mix in the water? Try using glow in the dark or neon paints too!
Tornados
Have you ever wondered why tornadoes do so much damage? Well in this experiment, using a few simple items from around the home we are going to create our very own mini tornado so we can see exactly what they get up too!
You will need a clear plastic bottle with a cap, half to 1tsp of washing up liquid depending on the size of the bottle, 1 tsp of vinegar (but not necessary) and water.
Fill your bottle about 3/4 full with water and add in 3-5 drops of blue food dye (depending on the size of your bottle and how dark you want the water to be). Add the soap and vinegar to your blue water. (Vinegar is only optional. It is used in the mixture just to lower the number of bubbles after you mix the water and the soap). Make sure you don’t mix to quickly as you don’t want too many bubbles. Make sure the lid is nice and tight. Hold the bottle by the lid and swirl the container around in a smooth circular motion lots of times. When you stop you should be able to see what looks like a tornado or a Vortex. It will slowly disappear as it reaches the top of the container.
The science
Tornadoes in the real-world look and behave in a similar way. When cold, dry air meets warm, moist air the atmosphere becomes very unstable causing high winds. They combine and begin to spin in a vertical direction. They contain a lot of energy and as they travel can cause a lot of damage on the ground.
Extensions
Try adding more food colouring or glitter to your tornado.
Chromatography


You will need:
Chrom- a- tog- graphy is a really long word and it is used in some really useful ways in science. It is a science method that is usually used on a substance to separate it out into lots of different parts. It is often used by forensic scientists to help them to solve crimes and might be used to analyse blood found at a crime scene.
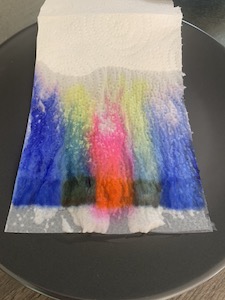
Collect one sheet of kitchen roll and fold it in half. Use some water-based colouring pens to draw the beginnings of a rainbow one cm up from the bottom of the paper towel (see photo). When you have coloured the beginnings of your rainbow, hold it from the top end. Add some water to the shallow dish and suspending the paper towel so the bottom just touches the water, you will begin to see it absorbing the water and travelling upwards. Your rainbow begins to inch towards the sky!
The science
A paper towel consists of fibres that have many small channels in their structure that the water can rise up through. As the water moves upwards through the paper towel it drags the water-soluble colouring pens, lifting the dye molecules with it. You may notice that lots of different colours appear. This method is really good at separating out all the hidden colours in your colouring pens.
Points to remember
Extension
Try it again using a different selection of colours. Does warm water in the dish make the chromatogram form quicker?
If you like some of these experiments why not purchase a Big Bang Science ‘Big Box of Experiments’. And look out for the monthly subscription boxes coming soon! You can like Big Bang Science on Facebook to keep up to date.
Thanks so much to our guest bloggers Maria & Alice. If you have family or friends in Poole, Dorset then be sure to let them know about the Poole Mumbler website.
There’s plenty on Gateshead Mumbler to help keep little ones (and big ones!) busy, check here for more ideas and info for playgroups, classes and fun days out from tots to teens!
If you’d like to keep up to date when new resources are added, please click here and like the Gateshead Mumbler Facebook page